| Tiling | |
|---|---|
|
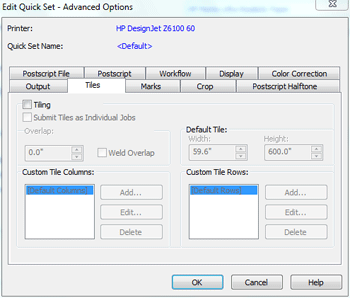
The Tiles option (Figure 1) in the Advanced Quick Set Options allows you to use and define tiles for your images. Tiling separates a job into two or more pieces. Typically, you use this option to print images larger than your media or for display and mounting purposes. This option should only be used if you want your Quick Set to tile every image the same way.
Click Enable Tiling to be able to set tiling options. Enabling Tiling allows you to choose any width for your image. Any portion of the image larger than the width of your page size is moved to another tile. When Enable Tiling is disabled, the image size is restricted to a single tile where the maximum width is the available print width of your printer.
The Submit Tiles as Separate Jobs option allows you to send each tile to RIP-Queue for printing as individual jobs. Using this feature improves your speed because the first tile can begin printing while remaining tiles are being processed.
The Maximum Width and Height values show the maximum page size loaded in your printer.
The Default Tile determines the size of each tile. The Default Tile size cannot be larger than the maximum Width and Height values. To change the default tile size, click on the data field for the dimension you want to change, and either type in the new dimension or use the up and down buttons next to the data field.
If you set the default tile size to less than the maximum print width of the printer, the Default Tile size takes precedence. The actual tile width is the width entered under either the default tile setting or Custom Tile.
When you choose a print size larger than the maximum page size for the printer, the image preview displays tile lines inside the crop box. These appear as additional dotted lines similar to crop box lines. If your final output has multiple rows and columns, be aware that making adjustments to a single tile affects all tiles associated with the same row and column. All tiles in the same vertical column have the same width. All tiles in the same horizontal row have the same height.
To adjust a tile’s size or the location of its border:
Row or column numbers count from upper left to lower right; those marked with an asterisk (*) use the default value for that dimension.
Custom Tiles allow you to create custom tile sizes for each column or row. Use this option to create tiles that are different sizes for each column or row. When RIP-Queue creates the tiles, the first Custom Tile will define the size of the tiles in the first column or row. The second Custom Tile will define the sizes of the tiles in the second column or row, and so on.
An Overlap is a portion of the image repeated on adjacent tiles. Tile Overlap helps you align and weld adjacent tiles. Overlap has the following attributes:
To set the overlap, click on the data field for overlap, and either type in the new dimension or use the up and down buttons next to the data field.
NOTE: The overlap is divided equally to both sides of the tile; therefore a one-inch overlap will contain one-half inch of each adjoining tile. Tiles that are part of the outside edge of the image will have no overlap on the outside edge. When you set an overlap, you will see no change in the display image.
Weld Overlap reserves a portion of the Overlap Tile area for the welding adhesive. Ink can inhibit the adhesive from forming a perfect bond when joining two tiles, and Weld Overlap ensures an ink-free area. Click Weld Overlap to use this feature.
NOTE: You must have an Overlap Tile area of at least half an inch to use Weld Overlap.
|
|

